Documentation
Introduction
This is Kiosk, a library for 3D Artists to make their local resources more accessable.
Despite having a hard drive full of hdri, assets, textures, we tend to favor common online libraries
due to their accessibility, offering easy search, filter, and preview options. This accessibility is crucial for 3D artists
and Kiosk want to bring that to you local resources.
Installation
-
After purchasing Kiosk, you'll receive an installer.exe
-
Double Click it and follow the instructions to install Kiosk
-
In some cases the windows defender will state unknown publisher. In that case go to more info and select run anyway (For more infos on that topic click here)
-
You received an email with a serial key, copy it and launch the kiosk app
-
Go to App -> Activate License and paste you serial key to activate the commercial license
Preferences
-
Change Preferences: Go to App -> Preferences
-
Thumbnail: Choose how kiosk displays your thumbnails, either as fit or fill the tile
-
Database Directory (Commercial Version Only): As a single user of the library you can choose User, if you are a studio or want to share a library with other artists that have access to these files, choose Studio and search for a path kiosk will store the database files to. Other Artists using kiosk can set it to the same location.
Manage Content
Why categories? By customizing categories in Kiosk, you can tailor your workspace to suit your specific workflow and preferences. Organizing your content into distinct categories not only enhances efficiency but also streamlines the process of exporting assets to your preferred DCC software. You can assign a custom function to each category that gets executed inside the dcc. For example, you can assign an "import and assign material" function to the materials category.

Edit Categories [Commercial Version]
-
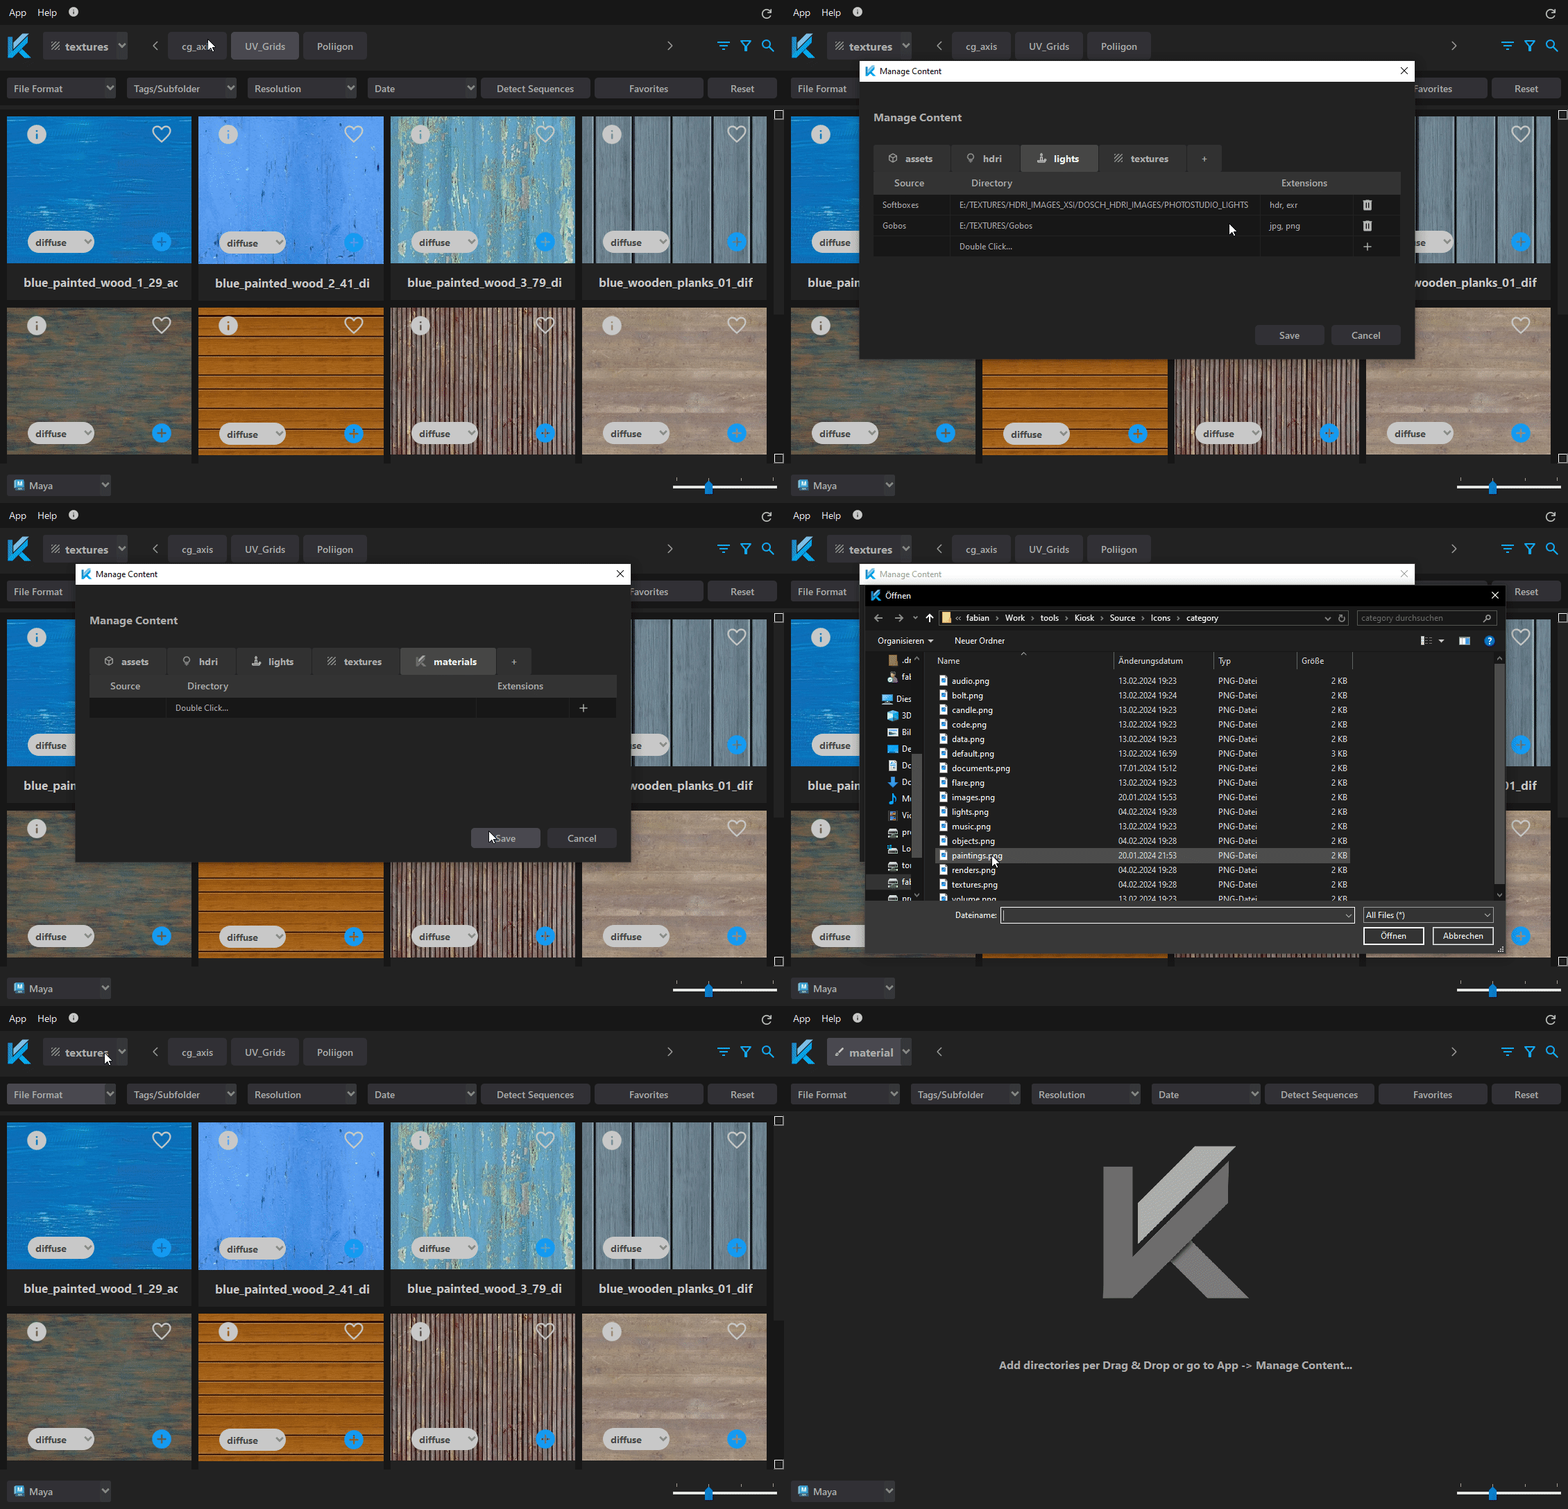
Content Manger: In the Content Manager of Kiosk, you have the option to customize categories to better organize your content. To access this feature, go to "App" -> "Content Manager."
-
Add Tabs: In the Manage Content dialog, you can add tabs similar to how you're used to in your web browser. Each tab represents a different category, such as materials or volumes. Click on the "+" button to add a new tab and give it a descriptive name.
-
Customize Tab Properties: Right-clicking on a tab allows you to perform various actions such as renaming, removing, or setting an icon. If you choose to set an icon, make sure to select one from the given folder. Custom icons should be saved in the same folder for them to be recognized by Kiosk.
Add Content

Remember: Kiosk does not copy or move your files anywhere. It simply remembers the directories you've specified and collects information about the files in a database.json file.
-
Go to the menu bar and select "App" -> "Content Manager."
-
In the Manage Content section, you'll find a table for each category. Double-click on an empty row in the table corresponding to the category you want to add content to.
-
A File dialog will appear prompting you to specify the path to the directory on your disk or server containing the files you want to add to your library. Navigate to the desired resource folder and select it.
-
Once you've set the path, give the source a name and specify a filename filter that the library should look out for. If you want to include all files in the directory and its subfolders, use the wildcard "*" symbol.
-
After entering the necessary information, click "Save." Kiosk will begin adding the files from the specified directory to your library. Please note that larger databases may take some time to load and collect.
-
If you add files to souces that are already implemented, right click the source filter and press "scan files"
Best Practices: It's recommended to add multiple sources gradually instead of adding your entire library into one source. This allows for better organization and filtering capabilities later on.
Shortcut: To make things fast and intuitive when adding single sources, you can simple drag and drop a folder from your explorer into kiosk. A pop-up dialog appears and lets you make some adjustments like source name and file extensions and you are good to go!
Manage Plugins

Install plugins
-
Access Manage Plugins: To manage plugins in Kiosk, go to the "App" menu and select "Plugin Manager."
-
Navigate to Desired Plugin: In the Manage Plugins section, you'll see a tab menu with all available plugins listed. Navigate to the plugin you want to install by clicking on its tab.
-
Install Plugin: Once you've selected the desired plugin, locate the "Install" button located on the top right corner of the screen. Clicking this button will open an installation dialog.
-
Choose Plugin Versions: In the installation dialog, you'll see a list of available dcc versions. Check the boxes next to the versions you want to install, and uncheck any versions you want to remove from Kiosk integration.
-
Complete Installation: After selecting the desired plugin versions, click "Install/Modify" to complete the installation process. Kiosk is now integrated into the selected dcc versions , allowing you to export library files to the application.
-
Restart Application: If you application has been open during the installation process, please restart the application to take effect.
By customizing commands in Kiosk, you can tailor the integration with your DCC software to meet your specific workflow and preferences, enhancing your overall experience with the application.

Customzie Commands
-
Access Customize Commands: Within the Manage Plugins dialog in Kiosk, you'll see a group box corresponding to each category. These group boxes contain commands that are executed inside the 3D Application to handle the library files.
-
Select a Command: Within each group box, you can select a command from the dropdown menu that best suits your needs for the given category. These commands help the DCC software understand how to handle the library files associated with the category. (Hover over the command item to see what they do and support)
-
Edit Commands (Commercial Version): Next to the "Category Commands" label, you'll find an "Edit" button. Clicking this button will guide you to a Python file that holds a collection of functions. These functions define the functionalities associated with the category commands.
-
Customize Functions (Commercial Version): Inside the Python file, you have the flexibility to add new functionalities or adjust existing ones to better suit your requirements. Each function defined in this file will be available in the dropdown menu of the corresponding category.
Context Menu
Right-clicking on the file will open the corresponding context menu with a variety of functionalities to access and edit the file.
Open File [Ctrl + O]
Opens file in default programm
Copy File [Ctrl + C]
Copy file to clipboard
Paste Thumbnail from Clipboard [Ctrl + V]
Paste preview thumbnail from clipboard
Send to dcc [Ctrl + S]
Exports file to dcc
Copy URL [Ctrl + Shift + C]
Copy filepath to clipboard
Reveal in Explorer [Ctrl + E]
Opens windows explorer and selects file
Choose Thumbnail
Opens Filedialog to select preview thumbnail
Filter and Sort

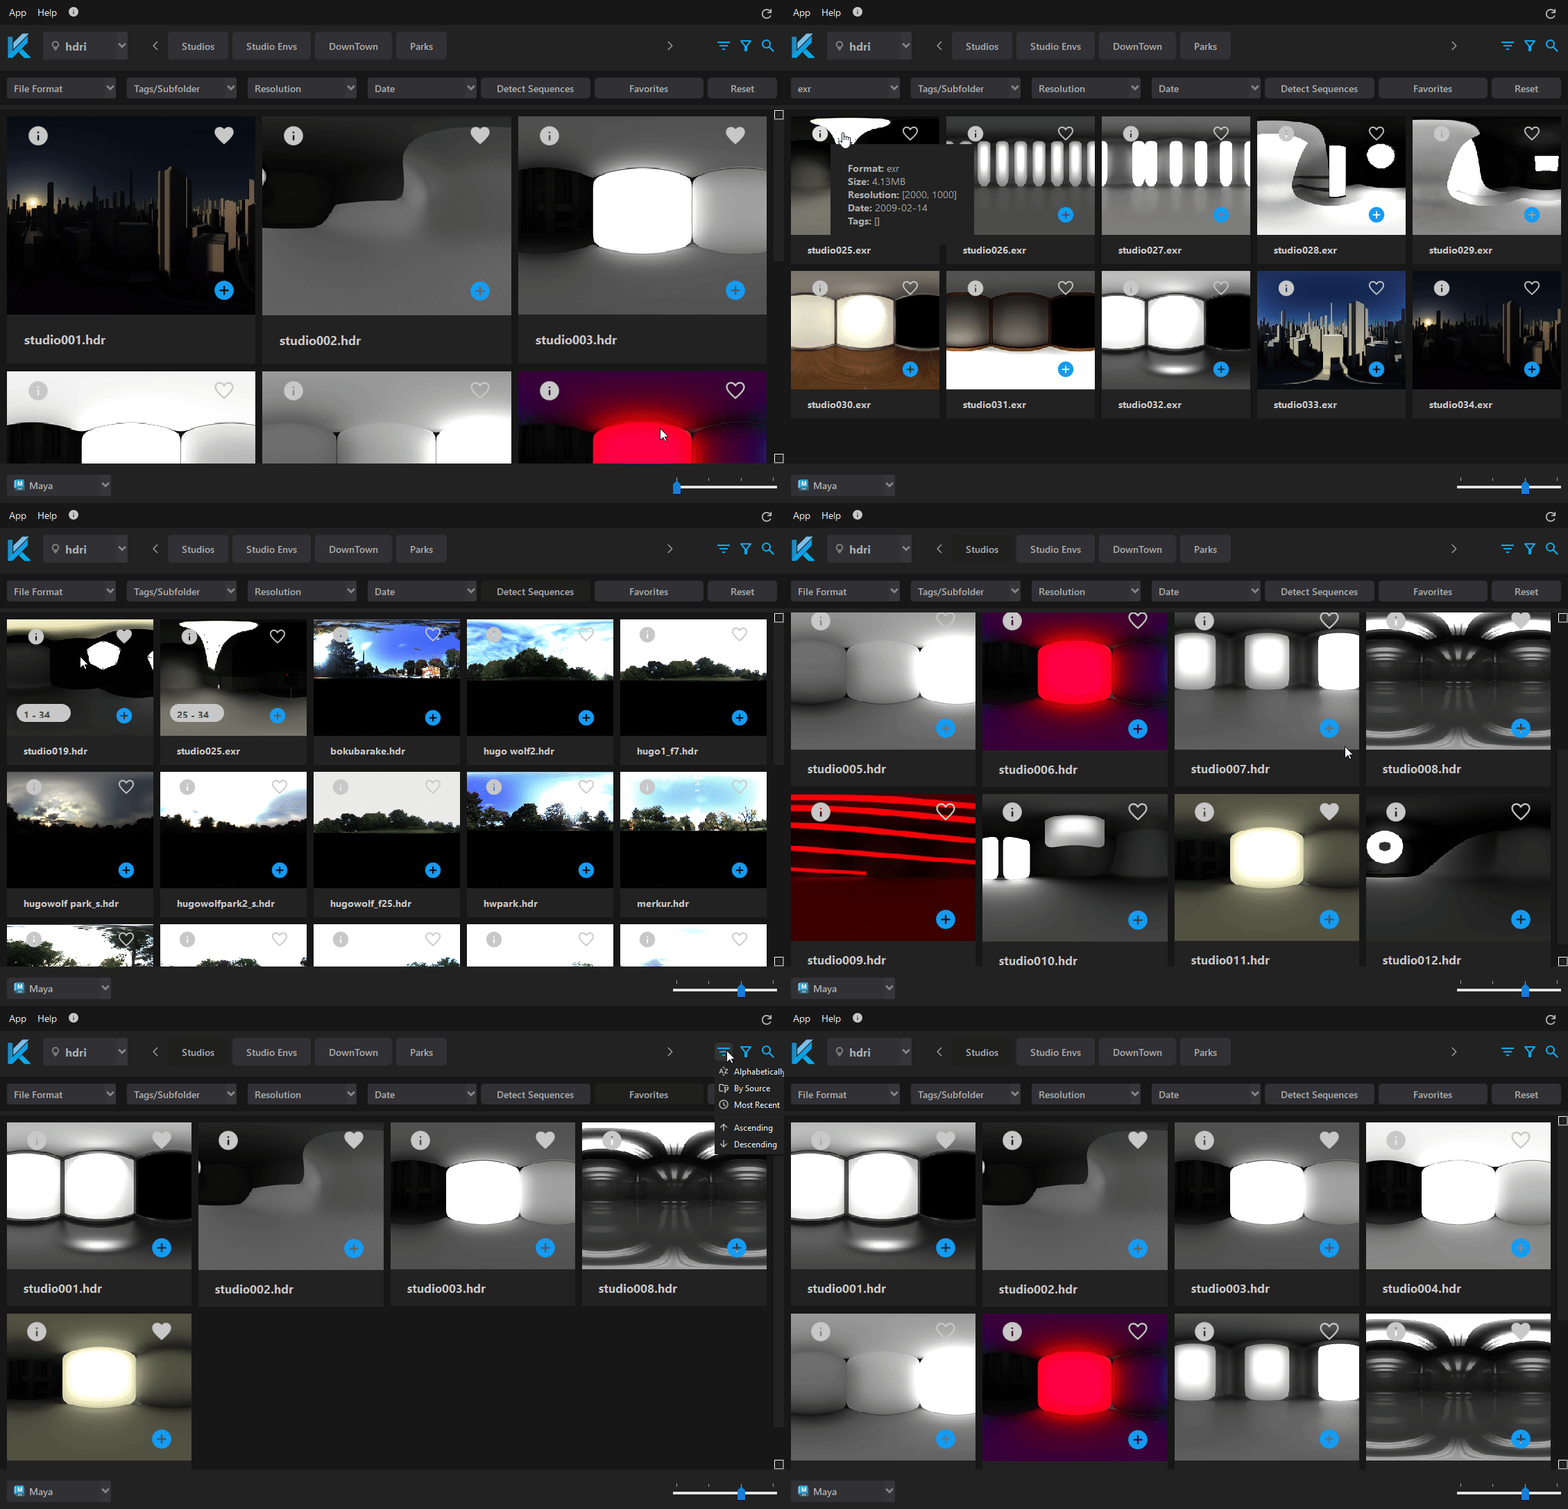
One of the most important features of any library is to be able to find what you need as fast as possible. Kiosk offers a bunch of different filter and sort functions that are relevant to the artist.
Options
Kiosk comes with a bunch of artist relevant filtering options. Here is the kiosk hierarchy that makes it possible.
-
Select category -> Collection of files of a certain category [e.g. hdri, models, textures, lights]
-
Select source -> Each category hold different sources [e.g. hdri holds polyhaven, cgaxis or even outdoor, studio]
-
File Formats -> Lists of all available file formats and filters the selected
-
Resolution -> Filter by image resolution [e.g. larger than 4k]
-
Date -> Filter by date when the files are created
-
Detect Sequences -> Less tiles inside the gallery means more space for unqiue files
-
Detect PBR Texture Sets -> Merges pbr-texturesets into one tile
-
Favorites -> Each file has a heart icon in the top-right corner that can be added to favorites and filtered
-
Search -> You can search for sources, filenames, tags and many more
Hidden Gems
Some things you might did not know that kiosk is capable of!
Drag and Drop
Copy/Move files just like inside the windows explorer
Open Kiosk
You can open Kiosk from inside your dcc
Advanced drag and drop
Ctrl drag will also copy/move sequences and texture sets
Thumbnails
Generates image file thumbs in the background
Infos
Hover over the info button to reveal more infos of the file